Emails
This documentation is for SuiteCRM versions 7.9.x and later. For earlier versions of SuiteCRM, please see Emails-LTS.
If you are upgrading from a version of SuiteCRM prior to 7.9.x, please see the Upgrading section of this document.
Overview
The Emails module in SuiteCRM allows Users to view, store, compose, send and receive email from their own personal email account or a shared inbox, for example a Support or Sales inbox. Emails can be imported and associated with a related SuiteCRM record, for example a Contact or an Account. These related emails can then be viewed on the history subpanel of the related record.
You will need to set up and have access to at least one personal or group email account in order to use the Emails module. See Personal Email Settings for information on setting up a personal email account. For information on configuring group, bounce handling and the system outbound mail accounts, please see the Emails section of the Administrator Guide.
The Emails Module can be found on the ALL menu on the top navigation bar. The module opens in List View, showing all the mail from the default mail account inbox in the main window.

|
The current inbox name is displayed on the button to the top right-hand side of the list view. Use this button to switch between accounts or other monitored folders. |
|
Unread emails have a purple highlight. |
|
Attachments are indicated by a paperclip. |
|
Emails which have been imported into SuiteCRM are indicated by a tick. |
|
Emails which have been flagged for follow up are indicated by an exclamation mark. |


As in other SuiteCRM modules, emails can be sorted by clicking on the column headings. Filter and column selections can also be made in the same way as for other modules.
The main actions for the Emails module are contained within the buttons on the Emails toolbar. Hover over these buttons to see the explanatory tooltip for each function.
|
Bulk Action |
Use the Bulk Action dropdown to bulk import mail, to mark mail as read/unread or to flag mail for follow up. Multiple emails can be selected in list view using the checkboxes. |
|
Compose Mail |
Opens the Compose window to create a new message. |
|
Settings |
Shortcut to your user profile where you can edit your user profile email settings. Add and remove accounts and select folders to view here. |
|
Check For Mail |
For personal email accounts, you can check for new mail with this button . Note that for Group email accounts, checking for email is done automatically via the Check Inbound Mailboxes Scheduler. You will need to ensure that your cron settings are correct for the scheduler to run. Please see link for further information on Schedulers. |
|
Select Folder |
This allows you to select which monitored folder you wish to view. If you have more than one account set up, you can also switch between accounts with this button. Expanding an account in the list will show all the monitored folders for the account. Select the required folder. |


Read Mail
Click on the subject line of an email to open it in Detail view. Use the Actions menu to reply to,
forward or import the email.

Compose Mail
Click the Compose Mail button or select Compose from the Sidebar to open a new compose window.
Emails can also be composed directly from a SuiteCRM record by clicking the email address on the record. This will open compose view in the Emails module. For new emails opened in this way, the To: field will be automatically populated and the email will related to the relevant record.
If you have opted to use an external email client in your user profile email settings, clicking an email address on a record in SuiteCRM will open a new email in your chosen editor.

-
Email Template: Select a template if required. See Email Templates for more information on creating and editing email templates. Once you have selected a template, a popup will warn you that the subject line and body of the email will be replaced by the contents of the email template. If you are using a template with variables, these will be populated with the relevant data from the related record when the email is sent. The To: field will also be automatically populated with the email address associated with the related record.
-
Related To: To associate the email with a particular record, select the module (e.g. Accounts, Contacts, Leads) and then click the Search arrow to search for the record. Alternatively, you can begin typing the name into the field and select the relevant record from the auto-complete list which appears.
-
From: If you have more than one email account configured, select the account from which to send the email. The Reply To and From settings for the selected account are displayed alongside for information.
-
To: Selecting a related record in the with a valid email address will automatically populate the To: field. Alternatively, the To:, Cc: and Bcc: fields can be populated manually or via the select buttons which appear when you click inside the fields.
-
Body: If you have configured a signature for this account in your user profile email settings, this will appear automatically in the body of the email.
The toolbar at the bottom of the Compose view has the following buttons:
|
Send Mail |
A confirmation message will appear when the message has been sent. |
|
Attach Files |
Use this button to browse for and attach an external file to the email. |
|
Attach Documents |
Use this button to attach a SuiteCRM Document to the email. Search for the required Document in the popup and click SELECT to attach it. |
|
Save Draft |
Drafts can be viewed by changing the folder in List view. |
|
Discard |
Discards the draft email without sending. |


Import Mail
Email can be imported into SuiteCRM and associated with a relevant SuiteCRM record (e.g. a contact or account record). This can be very useful in keeping a history of communication with a client, for example. Emails which have been imported and related to a record in SuiteCRM can be viewed from the record’s history subpanel.
Import Single Email
An individual email can be imported from Detail view. Open the email, and then select Import from the Actions dropdown menu.

Import One or More Emails
One or more emails can be imported at the same time from List view.
Select the email(s) you wish to import using the checkboxes to the left-hand side of the view.
Select Import from the Bulk Action menu.

On importing, a dialog will open allowing you to select which record to relate the email(s) to.

First select the module type from the drop-down. Next, use the search arrow button to find and select the relevant record, or begin typing the name into the field and select the required record from the auto-complete list. Click the OK button.
Note that if you are bulk importing mail, all emails will be related to the record selected here. If you need to relate mail to different records you will need to import these individually.
SuiteCRM can also be configured to automatically import emails for group mail accounts. See Group Email Accounts for more information.
Delete Mail
As only imported emails are stored in SuiteCRM, only imported email records can be deleted from the Emails module.
To delete an imported email record, open the email and then select Delete from the Actions menu dropdown. Note that this will only delete the SuiteCRM record and not the imap message. To remove emails from the Emails module, you will need to move or delete them using your external mail client.
Changes To Emails Module
Prior to version 7.9, SuiteCRM had to synchronise the email headers before users could view them. As of version 7.9, SuiteCRM contacts the email server directly - retrieving only the minimal information needed to process an operation. This eliminates the synchronisation process and significantly reduces amount of email information needed to be stored in the database.
Note to developers and administrators: The 'email_cache' table is deprecated in SuiteCRM 7.9.
Upgrading
If you are upgrading from a version of SuiteCRM prior to 7.9.x, you will need to use the Sync Inbound Email Account Tool on upgrading. This tool will synchronise mail already imported into SuiteCRM with your current IMAP accounts so that you will not have to synchronise in the future. We recommend taking a backup of your database and instance before upgrading.
Sync Inbound Emails Accounts Tool
From the Admin panel, select Repair and then Sync Inbound Email Accounts.

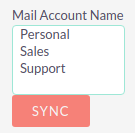
This will display a multiple selection box Mail Account Name listing all of the active inbound email accounts (including personal accounts) and a SYNC button.
|
Select the required accounts from the multiple selection box (use ctrl + click to select more than one) and click SYNC. |
The page will refresh and list the progression of the tool.
The tool goes through all the selected inbound email accounts and updates them to support new features in SuiteCRM 7.9 onwards:
-
Connects to the email server (via IMAP)
-
Downloads the email header information
-
Determines the orphaned status of emails
-
Updates the unique ID for each email
-
Corrects synchronisation problems
If an error occurs, you can run the tool on the other accounts which are working. The details of any errors can be found in the suitecrm.log file.